Managing Student Data in Google Workspace with GAM

By Liam Beveridge
Storing student information in Google Workspace is useful when data needs to be synced into other systems that integrate with Google. Workspace’s Custom Attributes allow admins to store any student information in Google. However, Google does not provide a method for accessing or updating custom attributes in bulk through the Admin Console. If a new custom attribute is being added, or if attributes are being updated for a large number of students, admins need a way to be able to access student data in Google en masse. Google’s API’s are one option for this, but they can be daunting for users that don’t have coding experience, and require additional work to configure. GAM (Google Admin Manager) is a more convenient and approachable solution and should be manageable for anyone that is comfortable navigating the command line.
GAM is a free tool that provides command line access to a variety of Google resources. There are several versions of GAM available, and we recommend using GAMADV-XTD3 (Advanced GAM) because it provides access to additional resources that the base version of GAM does not. The instructions for installing Advanced GAM, as well as documentation on using it, can be found on the GAMADV-XTD3 Github page. Getting GAM installed can be the trickiest part of using it, but the instructions will walk you through the process. You’ll want to make sure you have full admin privileges in your Google Workspace Org before you get started.
Diving straight into the GAM documentation can be overwhelming, even when you just need to figure out how to execute a couple of simple commands. Let's break down the commands needed to update a custom data field for a large number of users.
Download all user data
First, here is a command which will download all user data into a CSV:
gam print users full >> <output csv file>
This will output all the information for each user in your Google Workspace domain to a CSV, including all the custom attributes that aren’t included when you download a CSV of user data directly from the Google Admin Console. Now, you can open the CSV of user data and check the column titles to find the name of the field that you need to update. It should look like:
customSchemas.<custom schema category name>.<custom schema name> eg: customSchemas.studentData.guardianAddress
Update a field for one user
Next, you can use the schema name to update that field for a user with this command:
gam update user <user email> <custom schema name> <new value> eg: “gam update user teststudent@school.edu customSchemas.studentData.guardianStreetAddress “2341 Forest St.”
Once you run this command, GAM should report that one user has been successfully updated. If the command fails, double check that each field has been entered correctly.
Update multiple fields in one command
You can add additional fields to this command to update multiple values at once:
gam update user <user email> <custom schema 1 name> <new value for schema 1> <custom schema 2 name> <new value for schema 2>
Formatting a CSV for GAM
Of course, this command only updates one user. To update multiple users at once, you can use GAM’s CSV functionality to read in multiple users to update from a CSV. First, format a CSV with a column that lists the email address of each user you want to update, and a column for each custom schema you want to update for the users. Here is an example:
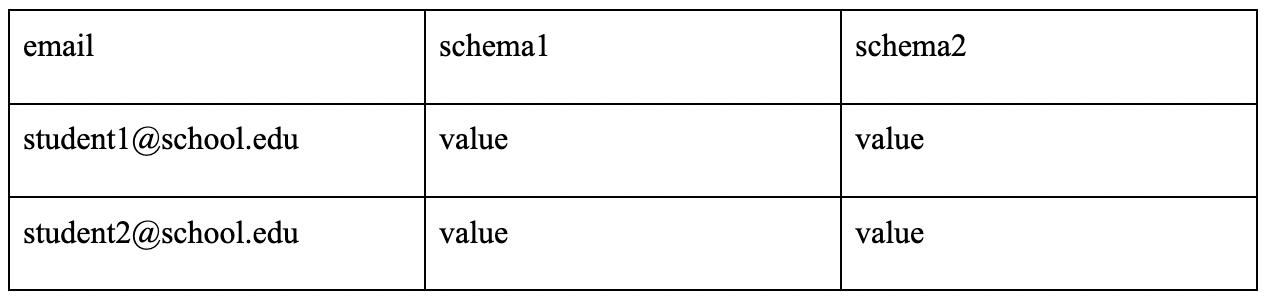
Now, you can run a command that passes in the names of the columns in your CSV as parameters for GAM to read.
CSV update command
Using the column names from the above example CSV the command would look like this:
gam csv <csv name> gam update user ~email <custom schema 1 name> ~schema1 <custom schema 2 name> ~schema2
GAM will run the command for each row in the CSV, substituting the values with the appropriate fields from the CSV, and report each successful update.
We recommend testing CSV updates with a small number of users first to ensure that fields are being updated correctly. GAM is a powerful tool, and you wouldn’t want to accidentally update the wrong field, erasing the information that it previously held. As a last resort, you can always refer back to the CSV of student data pulled at the beginning of this process to restore a field to its original values. Once you are confident that your command is working, you can add any number of users to your CSV and run your command again. It might take a while to complete if you are updating many users, but GAM will report each successful update as it runs. Once your command has finished, you can check users in the Google Admin Console, or check the admin logs to see the fields updated.
Updating user’s data just scratches the surface of GAM’s functionality. By exploring documentation on GAM, you may find other use cases that can help improve or automate workflows. The GAM cheat sheet is a great resource to quickly reference GAM commands and parameters. This GAMADV website is another helpful resource, and provides many example commands that can be copied or altered. The Advanced GAM wiki is the best comprehensive resource on everything GAM can do.